Comprehensive Nmap Scanning Tool


In cybersecurity, Nmap is a powerful and versatile tool used for network discovery and security auditing. To make Nmap even more accessible and user-friendly, I've created a script named "MR-Nmap." This script is designed to simplify the process of performing various Nmap scans with just a few selections. In this post, I'll walk you through how to use MR-Nmap and explain its features.
What is MR-Nmap?
MR-Nmap is a Bash script that provides an easy-to-use menu for performing different types of Nmap scans. Whether you are a beginner or a seasoned cybersecurity professional, MR-Nmap allows you to execute complex scans with ease. The script includes a variety of scan types, from basic ping scans to advanced vulnerability detection scans.
Features of MR-Nmap
User-Friendly Interface: The script presents a clear and colorful menu to guide you through the scanning options.
Multiple Scan Options: From quick scans to detailed vulnerability assessments, MR-Nmap covers a wide range of Nmap functionalities.
Customizable: You can enter custom Nmap options to tailor the scans to your specific needs.
Educational Purpose: While powerful, MR-Nmap is designed for educational and lawful use only.
How to Use MR-Nmap
Let's dive into how you can use MR-Nmap to perform various Nmap scans.
Step 1: Clone the script from Github
Clone the script from github using the following command below


Note: This script won't work if you don't have Nmap installed on your machine. By default, Nmap is installed on Kali Linux but if for some reason you it's not on your machine then you can run the setup.sh script to setup Nmap. use the following command.
Step 2: Give the script permission and run it
You would have to give the script executable permissions to run on your machine


Step2: Navigate into the directory and view its contents.


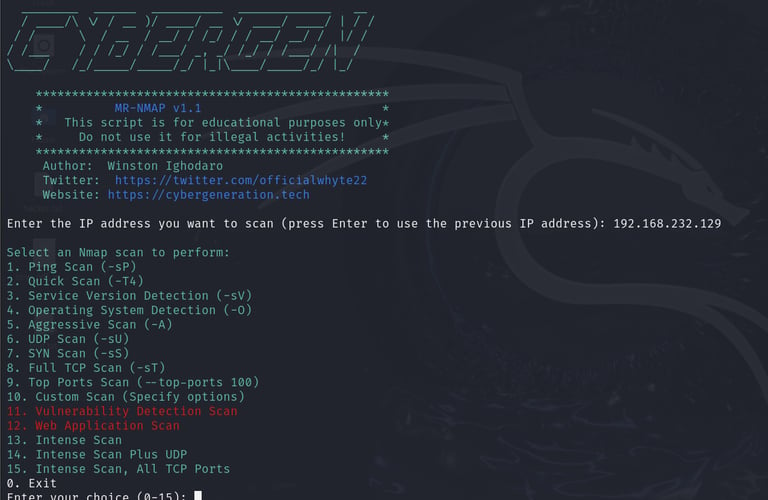
And just like that we have our script running. I know you might be wondering what the options presented really do, we will get to that soon. If you look closely at the image above you will notice number 11 and 12 are in red color, this is to let you know that they are strong and take some time to complete so you'd have to exercise some patience when running them. Below is a brief explanation of the scans and their functions:
Scan Options
Ping Scan (-sP): Detect if the hosts are up.
Quick Scan (-T4): Perform a quick scan with timing template 4.
Service Version Detection (-sV): Detect service versions.
Operating System Detection (-O): Detect operating systems.
Aggressive Scan (-A): Perform a detailed scan with OS detection, version detection, script scanning, and traceroute.
UDP Scan (-sU): Perform a UDP scan.
SYN Scan (-sS): Perform a SYN scan.
Full TCP Scan (-sT): Perform a full TCP scan.
Top Ports Scan (--top-ports 100): Scan the top 100 ports.
Custom Scan: Enter custom Nmap options.
Vulnerability Detection Scan: Perform a scan using vulnerability detection scripts.
Web Application Scan: Scan web applications for vulnerabilities.
Intense Scan: Perform an intense scan with OS detection, version detection, script scanning, and traceroute.
Intense Scan Plus UDP: Combine an intense scan with a UDP scan.
Intense Scan, All TCP Ports: Perform an intense scan on all TCP ports (1-65535)
