
Inside My Windows Malware Analysis Lab: From Suspicious Installer to Full Compromise
PROJECTSPROJECTS
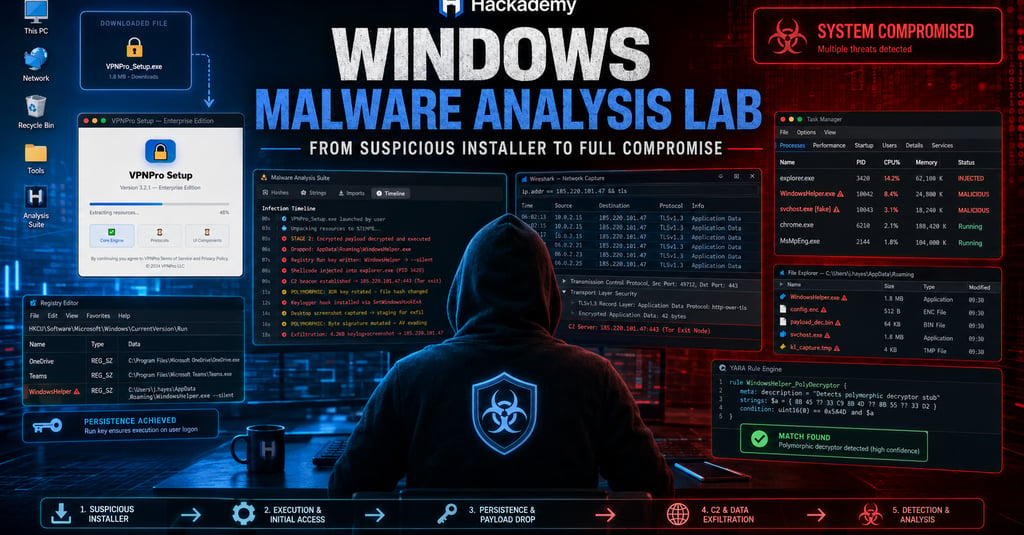
I created this Windows Malware Analysis Lab to help students understand how a suspicious file can move from looking normal to fully compromising a system. The idea behind the lab is to make malware analysis practical, visual, and beginner-friendly. Instead of only explaining malware concepts in theory, I wanted students to see the full investigation flow: execution, infection, process analysis, persistence, dropped files, network traffic, event logs, PowerShell investigation, hash changes, strings, imports, timeline, and YARA detection.
The lab starts with a clean Windows-style environment. On the left side, I included the tools students need for investigation: Task Manager, Registry Editor, File Explorer, Wireshark, Event Viewer, PowerShell, Analysis Suite, and YARA Engine. On the right side, the downloaded file is shown as VPNPro_Setup.exe. The goal is for students to investigate what happens after this file is executed and then use evidence from different tools to answer the challenges.
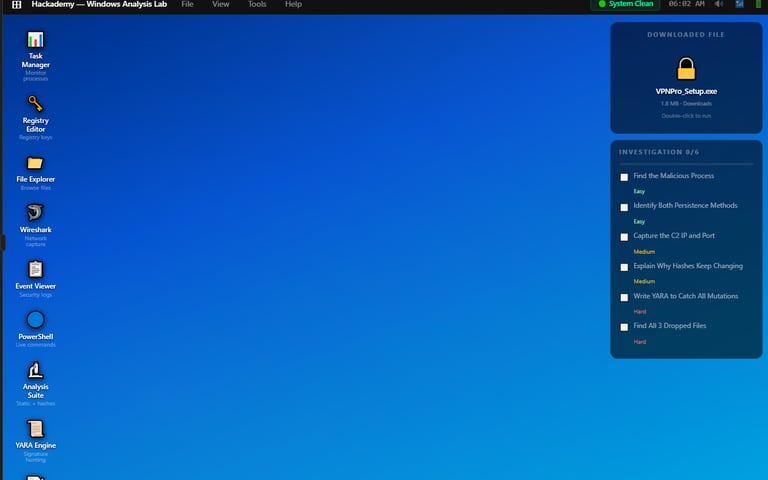
The first screenshot shows the system before infection. The status says the system is clean, and the downloaded file is waiting to be executed. This is important because it gives students a baseline. Before analyzing any suspicious file, you need to know what the system looks like before the file runs. That way, when new processes, files, registry keys, network connections, and logs appear later, you can connect them back to the suspicious file.
The downloaded file is named VPNPro_Setup.exe, which is realistic because malware often hides behind trusted-looking names. A user may think they are installing a VPN application, an update, a document viewer, or a business tool. This teaches students that file name alone does not prove a file is safe.
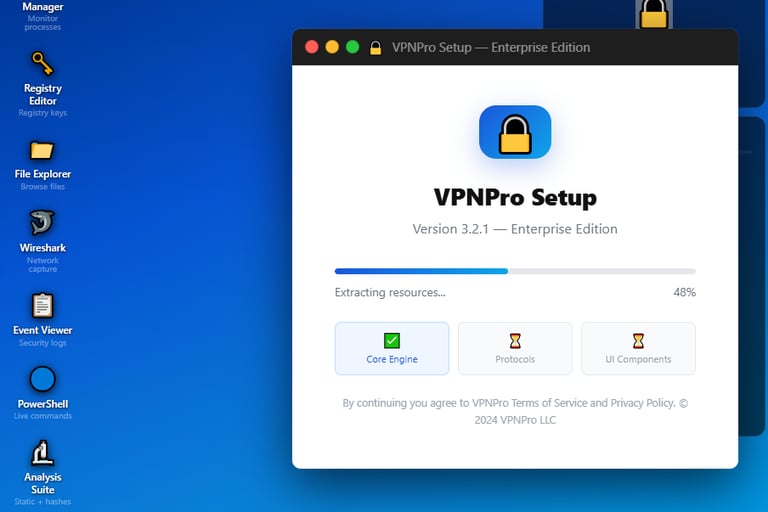

The second screenshot shows the installer running. It looks like a normal setup window with a progress bar and installation steps. This is one of the most important teaching points in the lab because malware does not always look suspicious at first. Many malicious files use clean-looking installers, icons, progress bars, and fake company names to make the victim trust them.
In this stage, the file is pretending to install a VPN product, but the student should understand that the visible installer may only be a cover. Behind the scenes, a malicious program can unpack resources, drop payloads, create persistence, inject into another process, or start network communication.


The third screenshot shows the lab after the file has executed. The environment changes from clean to infected, and the screen now shows that the system is compromised. This helps students understand that execution is the turning point. Before execution, the file is only suspicious. After execution, the analyst can start collecting real behavioral evidence.
This screenshot also shows the investigation checklist on the right side. The student must find the malicious process, identify persistence methods, capture the C2 IP and port, explain why the hashes keep changing, write YARA logic to catch mutations, and find dropped files. These tasks guide the student through the full investigation process.
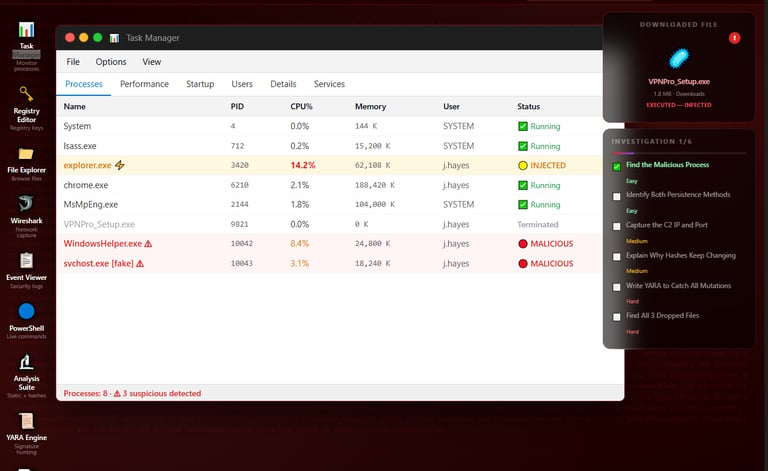
The fourth screenshot shows Task Manager after infection. This is where the student finds the malicious process. The original VPNPro_Setup.exe has terminated, but suspicious processes are now visible. The lab highlights WindowsHelper.exe as malicious and also shows a fake svchost.exe.
This teaches students an important malware behavior: the first file the user runs may not be the real long-term payload. The installer can drop another file and then exit. The dropped file may use a normal-looking name like WindowsHelper.exe or svchost.exe to blend in with legitimate Windows processes.
The fake svchost.exe is also important because attackers often use names that look close to real Windows processes. A beginner may see svchost.exe and assume it is normal, but the context matters. The path, user, parent process, CPU activity, and status all help determine whether it is legitimate or suspicious.
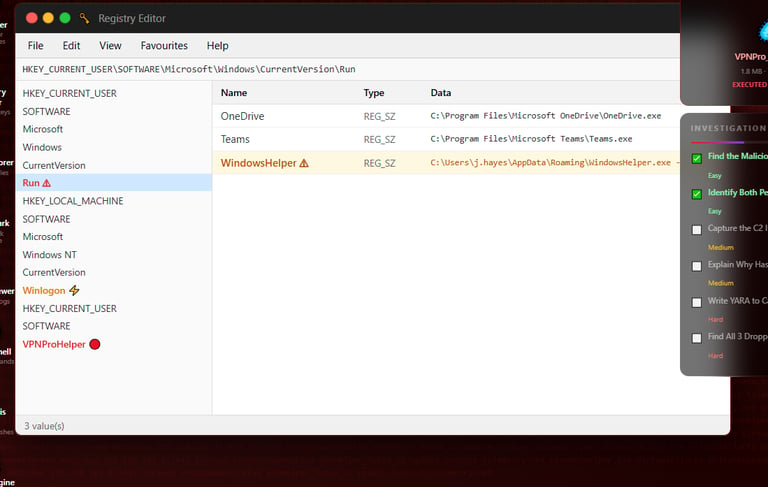
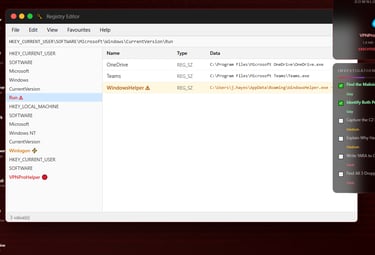
The fifth screenshot shows Registry Editor opened to the current user Run key. This is one of the persistence methods in the lab. The entry named WindowsHelper points to a file inside the user’s AppData Roaming folder.
This teaches students what persistence means. Malware does not only want to run once. It often wants to survive reboot or user login. One common way to do this is by creating a registry autorun key. When the user logs in again, Windows automatically starts whatever program is listed in that Run key.
This is why registry inspection matters during malware analysis. If an analyst only checks running processes but does not check persistence locations, they may miss how the malware will come back after reboot.

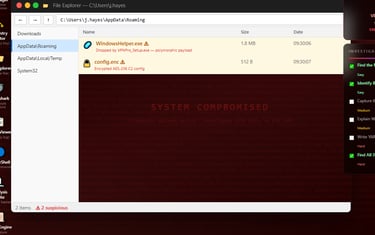
The sixth screenshot shows the AppData Roaming folder. The file WindowsHelper.exe appears there, and it is marked as dropped by VPNPro_Setup.exe. There is also config.enc, which is described as an encrypted AES-256 configuration file.
This screenshot teaches students how to track dropped files. Malware often drops payloads into user-writable locations like AppData because it does not always need administrator privileges to write there. AppData is also noisy because many normal applications store files there, which makes it a useful hiding place.
The encrypted config file is also important. Malware may store its C2 details, keys, campaign settings, or execution settings in an encrypted config. Even if the analyst cannot read it directly, its presence is still valuable evidence.
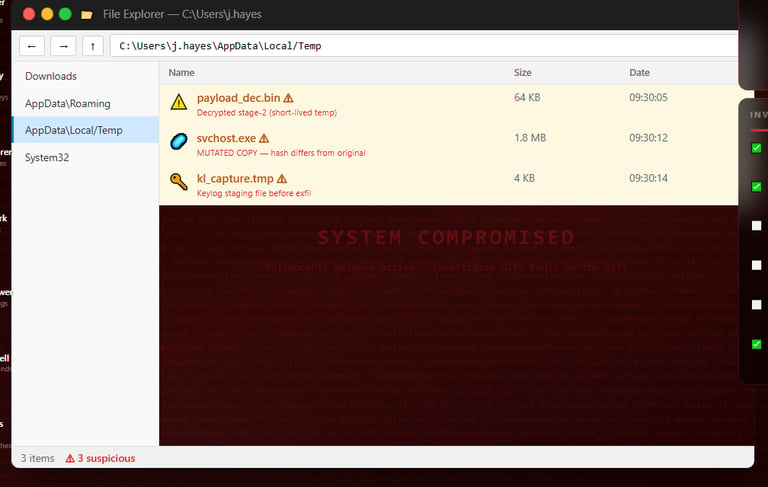
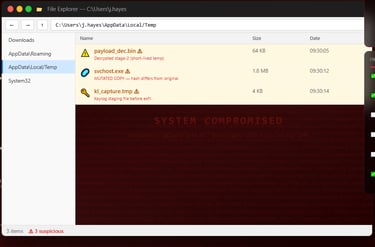
The seventh screenshot shows the Temp folder. This folder contains payload_dec.bin, svchost.exe, and kl_capture.tmp. The lab labels them as suspicious. The payload_dec.bin file is a decrypted stage two payload. The svchost.exe file is a mutated copy, and kl_capture.tmp is a keylog staging file before exfiltration.
This section teaches students that the Temp folder is another common place to investigate. Malware may unpack or decrypt payloads there because Temp is easy to write to and often overlooked. The keylog staging file is important because it shows that the malware is not just running. It is collecting data from the victim.
At this point, students can confirm three dropped files: WindowsHelper.exe, payload_dec.bin, and kl_capture.tmp. They can also include config.enc and the fake svchost.exe as important supporting evidence.

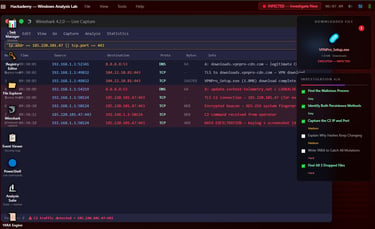
The eighth screenshot shows Wireshark capturing network traffic. The filter focuses on 185.220.101.47 and port 443. The traffic shows a DNS query for a lookalike telemetry domain, a TLS C2 connection, an encrypted beacon, a C2 command received from the operator, and data exfiltration.
This is where students learn how to capture the C2 IP and port. The C2 server is 185.220.101.47, and the port is 443. The use of port 443 is important because attackers often use HTTPS-like traffic to blend in with normal encrypted web traffic.
The lab also shows data exfiltration involving keylog and screenshot data. This helps students understand that malware may not only connect out for commands. It may also send stolen information back to the attacker.
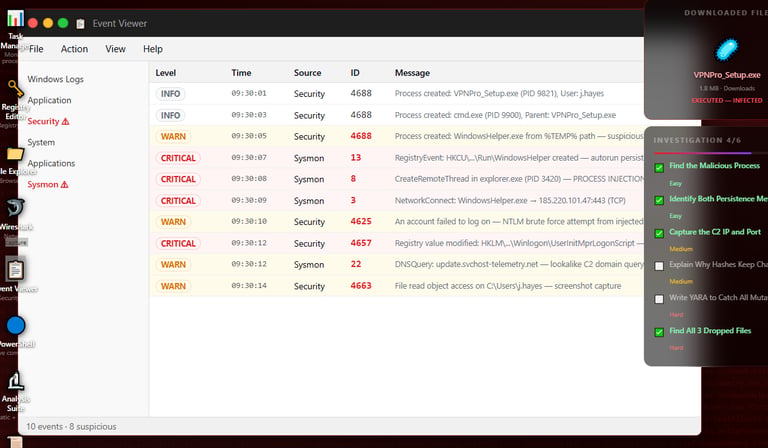
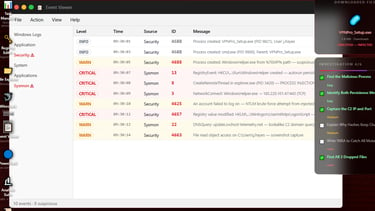
The ninth screenshot shows Event Viewer. This section is important because logs help build the timeline of the infection. The lab shows process creation, suspicious process execution from a Temp path, registry autorun persistence, process injection into explorer.exe, network connection to the C2 server, DNS query to a lookalike domain, failed logon activity, and file read activity.
This teaches students that Event Viewer is one of the best places to connect evidence. For example, the process creation event shows when VPNPro_Setup.exe ran. The Sysmon registry event shows when persistence was created. The process injection event shows suspicious behavior involving explorer.exe. The network connection event links WindowsHelper.exe to the C2 IP.
The main lesson is that logs help prove what happened and when it happened.
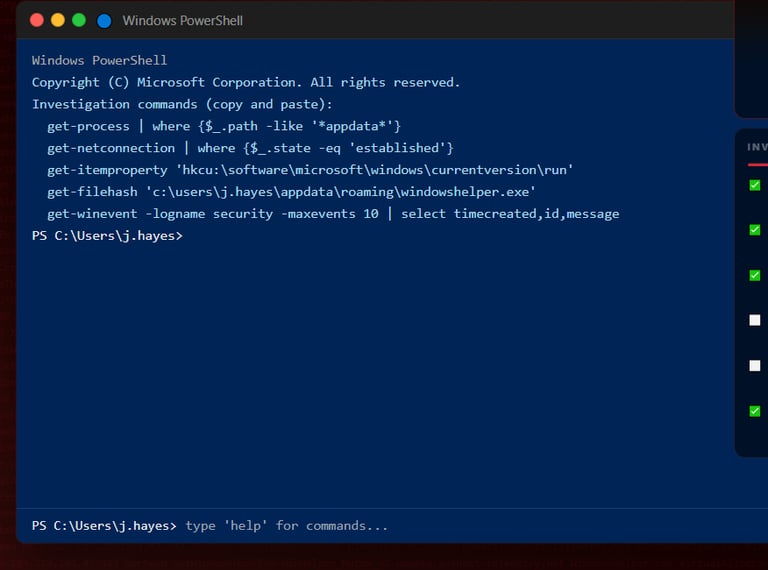
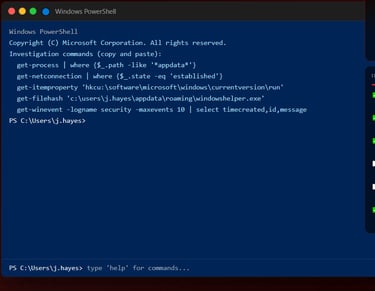
The tenth screenshot shows the PowerShell investigation commands. I included this because students need to learn how to investigate with commands, not only graphical tools.
The commands shown help check processes running from AppData, established network connections, registry Run keys, file hashes, and recent security logs. This teaches students that PowerShell can quickly confirm what they are seeing in Task Manager, Registry Editor, Wireshark, and Event Viewer.
The purpose of the command section is not just to copy and paste. The goal is to help students understand what each command proves. For example, checking the process path can reveal malware running from AppData. Checking network connections can reveal the C2 connection. Checking the Run key can prove persistence. Checking the hash can help identify changes between samples.
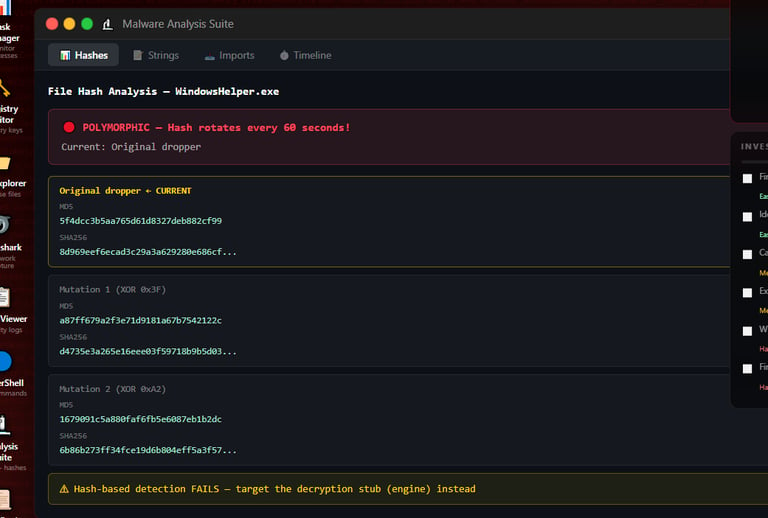
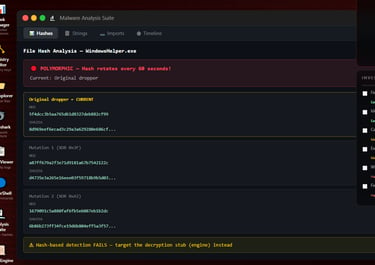
The eleventh screenshot shows the hash analysis section. This is where the lab explains why the hashes keep changing. The file is polymorphic, meaning it mutates so the hash changes over time or between versions.
This is an important malware analysis lesson. Hash-based detection can fail when malware changes its file content. If every mutation produces a different MD5 or SHA256 hash, then a defender cannot rely only on one static hash. The lab explains that instead of targeting only the hash, students should look for more stable indicators, like the decryption stub, mutex, behavior, imports, strings, and C2 patterns.
This is one of the best learning moments in the lab because it shows the difference between weak detection and stronger detection.
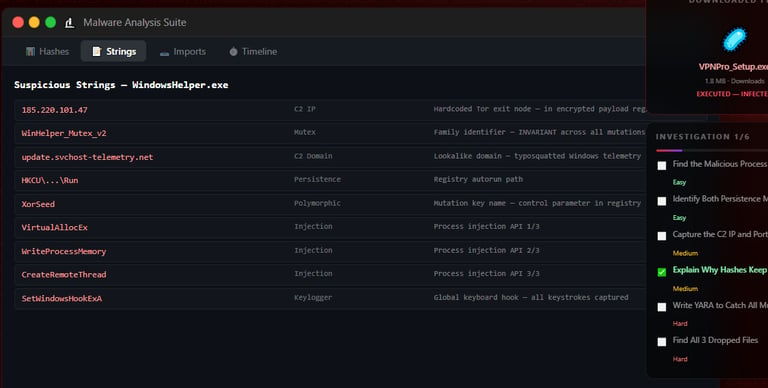
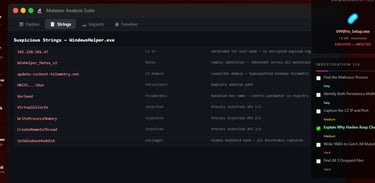
The twelfth screenshot shows suspicious strings found inside WindowsHelper.exe. These include the C2 IP 185.220.101.47, mutex WinHelper_Mutex_v2, lookalike domain update.svchost-telemetry.net, registry Run persistence, XorSeed, process injection APIs, and a keylogging-related API.
This section teaches students how strings can reveal malware behavior. Even if the file is packed or partially obfuscated, some strings may still give clues. A mutex can identify a malware family or campaign. A C2 IP can reveal network infrastructure. Registry paths can reveal persistence. API names can reveal behavior like injection or keylogging.
Students should understand that strings are not always complete proof by themselves, but they are strong clues that guide the investigation.
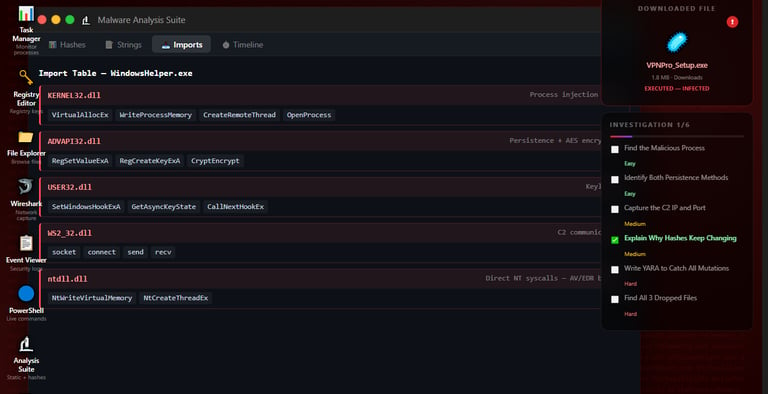
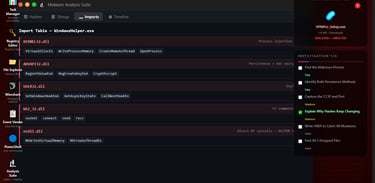
The thirteenth screenshot shows the import table. This helps students understand what Windows APIs the file may use. The lab highlights APIs from KERNEL32.dll, ADVAPI32.dll, USER32.dll, WS2_32.dll, and ntdll.dll.
The imports show behavior related to process injection, persistence, encryption, keylogging, network communication, and lower-level system calls. For example, VirtualAllocEx, WriteProcessMemory, and CreateRemoteThread are commonly associated with process injection. Registry APIs like RegSetValueExA and RegCreateKeyExA can support persistence. Network APIs like socket, connect, send, and recv can support C2 communication.
This section teaches students that imports help predict what a program is capable of doing before or during analysis.
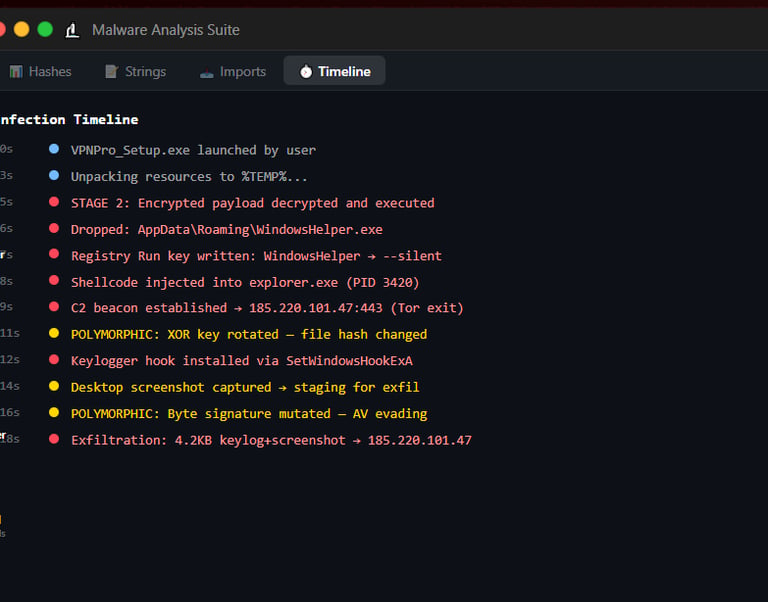
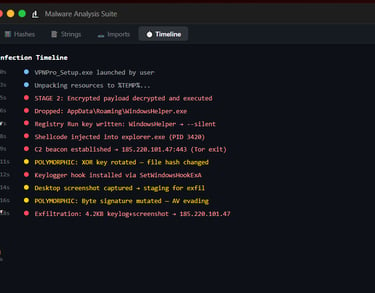
The fourteenth screenshot shows the infection timeline. This is one of the clearest parts of the lab because it puts the attack in order.
The timeline starts with the user launching VPNPro_Setup.exe, then unpacking resources, decrypting and executing the stage two payload, dropping WindowsHelper.exe, writing a registry Run key, injecting shellcode into explorer.exe, establishing C2 communication, rotating the XOR key, installing a keylogger hook, capturing a screenshot, mutating the byte signature, and exfiltrating keylog plus screenshot data.
This teaches students that malware analysis is not only about finding one bad file. It is about understanding the full sequence of behavior. A good analyst should be able to explain what happened first, what happened next, what evidence supports it, and what the impact was.
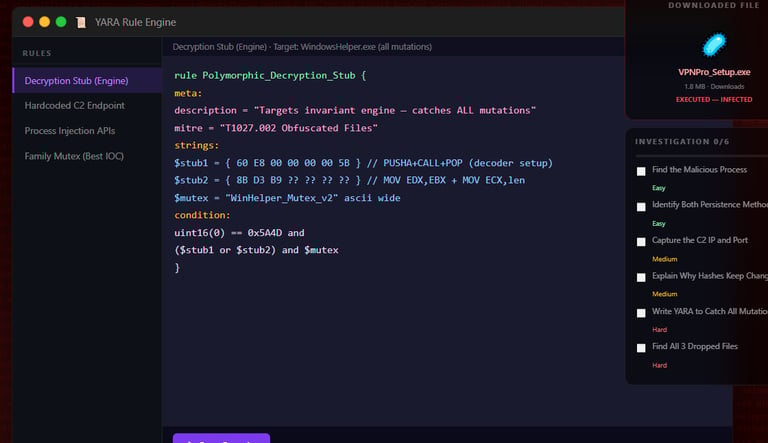

The fifteenth screenshot shows the YARA Rule Engine. This section teaches detection engineering. The rule is designed to detect the polymorphic decryption stub instead of relying only on changing hashes.
This is important because the malware mutates, which means simple hash-based detection is weak. The YARA rule focuses on more stable parts of the malware, such as the executable header, decryption stub patterns, and mutex. That makes the rule more useful across mutations.
The main lesson here is that good detection should target behavior and stable indicators, not only one hash.
This lab is important because it teaches the complete investigation cycle. Students start with a suspicious installer, observe the infection, identify the malicious process, check persistence, find dropped files, capture C2 traffic, review logs, investigate with PowerShell, understand polymorphism, inspect strings and imports, build a timeline, and write a YARA detection.
For my portfolio, this project shows that I am not only learning malware analysis. I am creating hands-on labs that help students understand how malware behaves on Windows systems and how defenders investigate it. The lab connects endpoint evidence, network evidence, registry evidence, file evidence, and detection logic in one place.
The biggest lesson from this lab is that malware investigation is about evidence. You do not just say a file is malicious because it looks suspicious. You prove it by showing the process, the persistence method, the dropped files, the C2 traffic, the logs, the strings, the imports, the timeline, and the detection logic.
Overall, this Windows Malware Analysis Lab gives students a practical way to learn how a suspicious installer can lead to a full system compromise and how defenders can investigate each stage step by step.