
Inside My SOC Network Forensics Lab: Investigating Data Exfiltration
PROJECTSPROJECTS
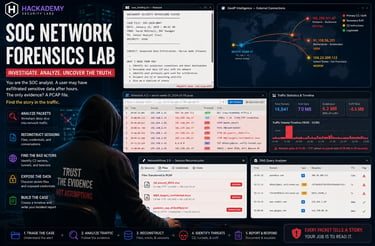
I created this SOC Network Forensics Lab to help students understand how analysts investigate suspicious network activity using packet evidence. The goal of this lab is to make students think like junior SOC analysts. Instead of guessing what happened, they must review the PCAP, follow the traffic, identify suspicious destinations, confirm what data left the network, and complete an incident report with evidence.
The case is based on a fictional company environment. The subject is Marcus Webb, a Senior Finance Analyst, and the workstation being investigated is WKSTN-WEBB-01 with the IP address 192.168.1.45. According to the case briefing, his laptop was active after hours, and the DLP system flagged a large outbound transfer between 19:00 and 23:00.
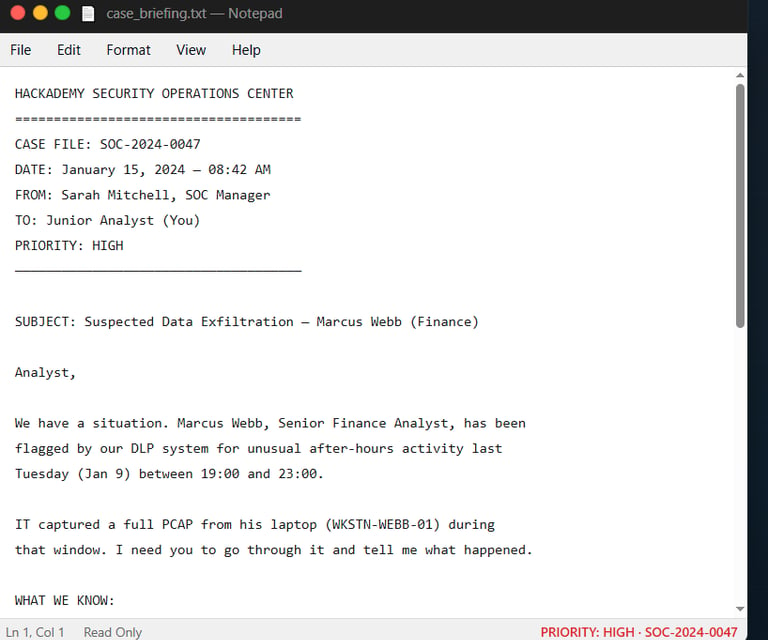
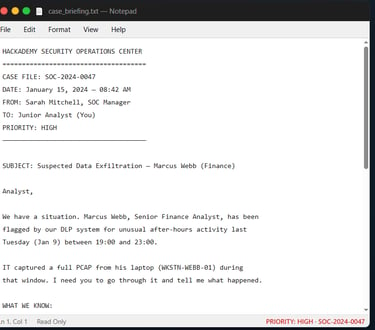
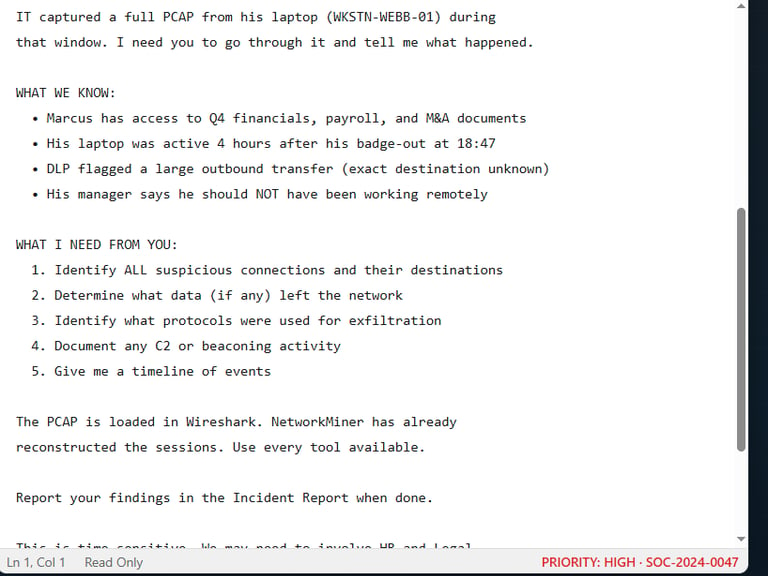
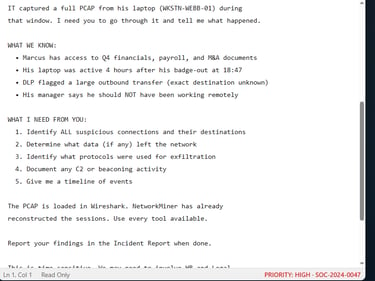
The first screenshot shows the case briefing. I included this because every investigation should start with context. Before students open Wireshark or NetworkMiner, they need to understand who is involved, what system is affected, what time window matters, and what the SOC manager is asking them to find.
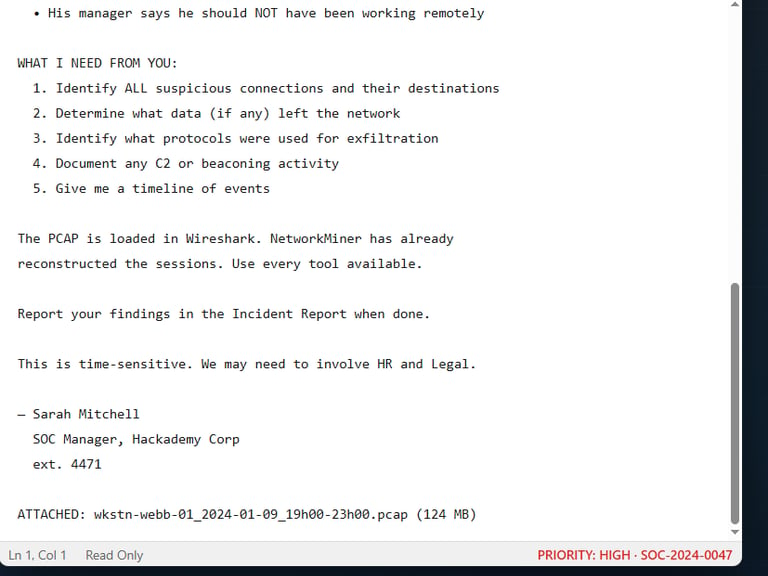
In this case, the analyst is asked to identify suspicious connections, determine what data left the network, identify the protocols used for exfiltration, document C2 or beaconing activity, and create a timeline of events. This gives the lab a realistic SOC workflow because the student is not only looking at packets. They are answering investigation questions.
The second screenshot shows the specific investigation requirements. Marcus Webb had access to Q4 financials, payroll, and M&A documents. His laptop was active hours after badge-out, and his manager said he should not have been working remotely. These details matter because they help students understand why the activity is suspicious.
This teaches an important lesson: network forensics is not only technical. Analysts also need business context. A file transfer may look normal until you understand the user, the time, the data involved, and whether the behavior matches their role.
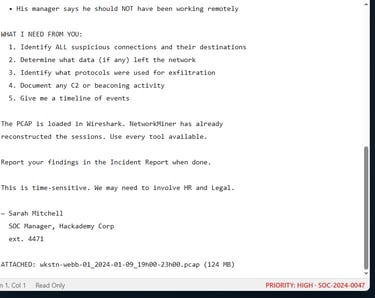
The third screenshot shows the attached PCAP file, wkstn-webb-01_2024-01-09_19h00-23h00.pcap. This tells the student what evidence they are working from. In real investigations, the PCAP becomes the source of truth for network activity during the capture window.
The goal is to use that PCAP to prove what happened. The student must not assume the user stole data just because the case says “suspected.” They must prove it by showing traffic, destinations, protocols, files, credentials, and timelines.

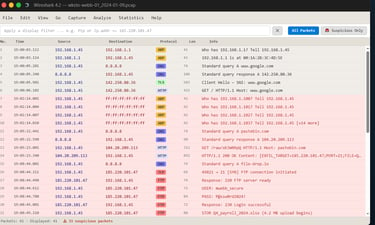
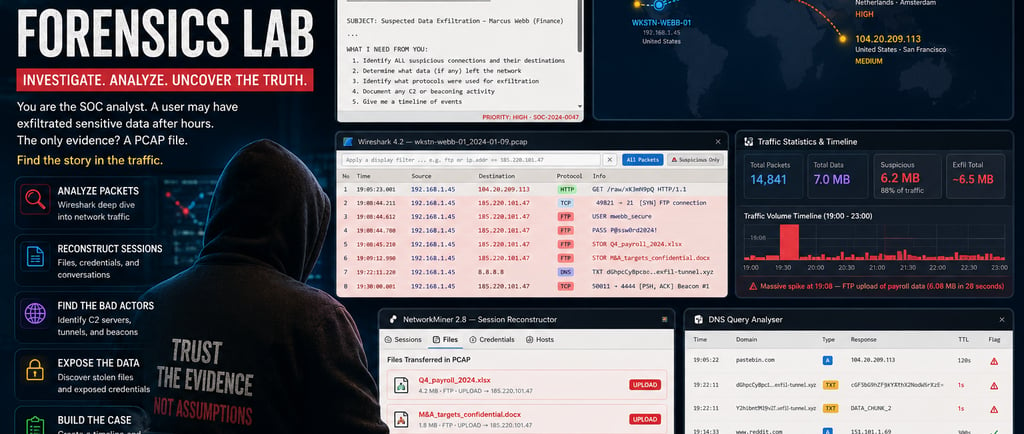
The fourth screenshot shows Wireshark with the packet capture loaded. At the beginning, we see normal activity like Google DNS and browsing, but then suspicious activity starts appearing.
The first major clue is the workstation 192.168.1.45 making a DNS query for pastebin.com, followed by an HTTP request to a Pastebin raw URL. The response contains instructions pointing to an exfiltration target: 185.220.101.47, port 21, and a file pattern related to payroll.
This is important because Pastebin is being used as a staging location for instructions. In a real investigation, attackers sometimes use public services to host configuration or command instructions because those services may blend in with normal web traffic.
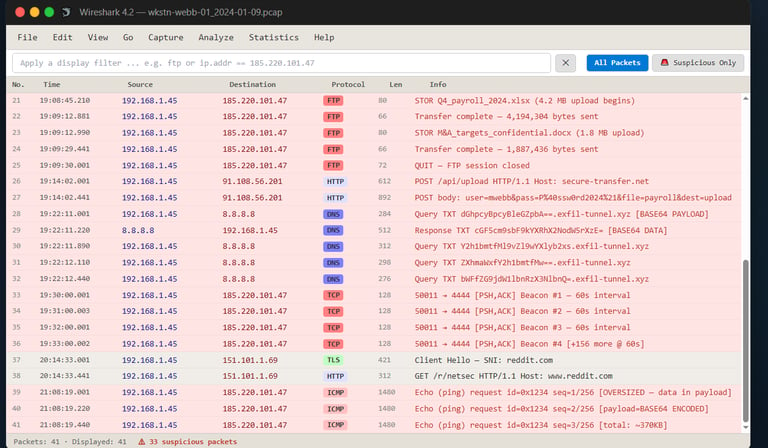

The fifth screenshot shows the most important traffic in the lab. The workstation connects to 185.220.101.47 over FTP, and Wireshark clearly shows plaintext FTP credentials.
The username is mwebb_secure, and the password is visible in the traffic. This teaches students why FTP is risky. FTP does not protect credentials the way encrypted protocols do, so anyone analyzing the traffic can see the username and password.
This screenshot also shows the file uploads. The command STOR Q4_payroll_2024.xlsx confirms that a payroll file was uploaded. Another command shows STOR M&A_targets_confidential.docx, which confirms that a confidential M&A document was also uploaded.
Later in the same capture, the workstation sends DNS TXT queries to exfil-tunnel.xyz. The subdomains look like encoded data chunks, which points to DNS tunneling. This teaches students that exfiltration can happen through more than one protocol.
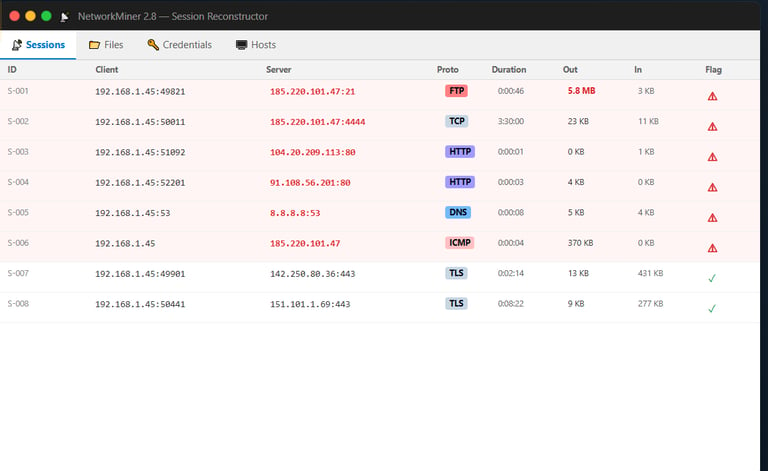
The sixth screenshot shows NetworkMiner reconstructing network sessions. I added this because Wireshark is good for packet-level evidence, but NetworkMiner helps students see the bigger session picture.
The suspicious sessions show 192.168.1.45 communicating with 185.220.101.47 over FTP, with about 5.8 MB outbound. There is also a long TCP session to 185.220.101.47:4444, which is suspicious because it lasts for several hours and matches the beaconing behavior.
This section teaches students how to use multiple tools to confirm the same finding. Wireshark shows the packet evidence, while NetworkMiner summarizes sessions, protocols, duration, and outbound data volume.
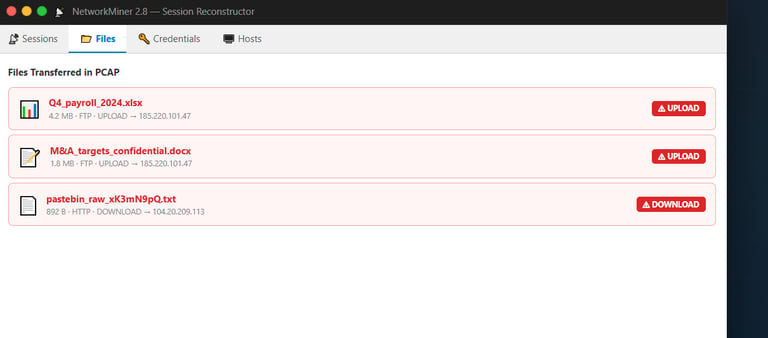
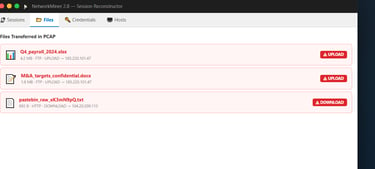
The seventh screenshot shows files reconstructed from the PCAP. This is where students can clearly see which files were transferred.
The files confirmed in the lab are Q4_payroll_2024.xlsx and M&A_targets_confidential.docx. Both were uploaded to 185.220.101.47 over FTP. The screenshot also shows a Pastebin raw text file downloaded from 104.20.209.113, which supports the finding that the workstation retrieved instructions before the exfiltration happened.
This is one of the strongest evidence sections because it directly answers the question: what data left the network?
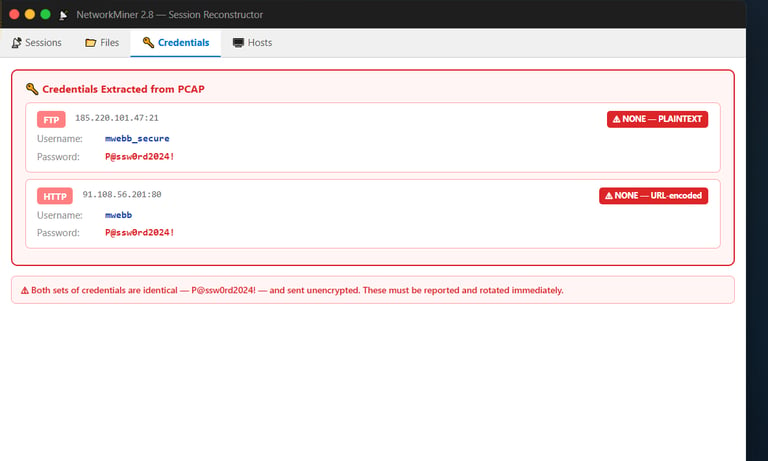
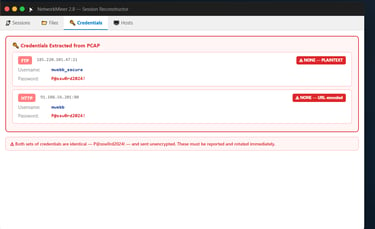
The eighth screenshot shows credentials extracted from the PCAP. It confirms that credentials were exposed in two places: FTP and HTTP.
The FTP credential is mwebb_secure, and the password is visible in plaintext. The HTTP section also shows credential information sent in a weak format. This teaches students that credential exposure is a separate incident impact, even beyond the file exfiltration.
If credentials are exposed, they must be reported and rotated immediately. A good incident report should not only say “files were stolen.” It should also explain what accounts may now be compromised.
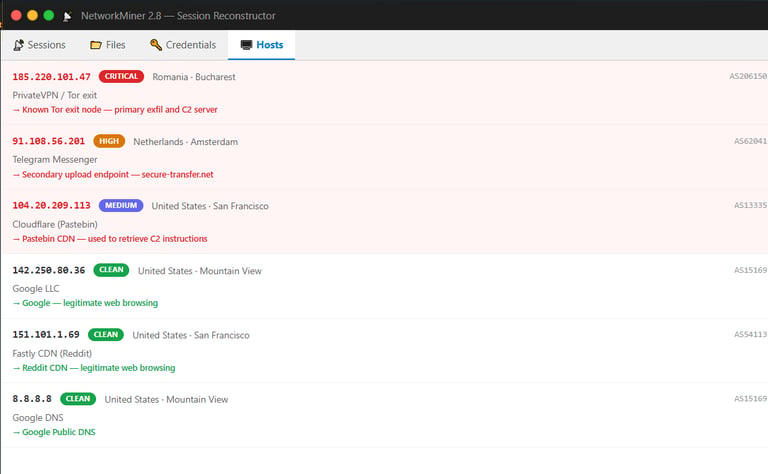
The ninth screenshot shows the external hosts contacted during the investigation window. This helps students classify destinations and separate suspicious infrastructure from normal browsing.
The primary suspicious IP is 185.220.101.47, marked critical and associated with a PrivateVPN or Tor exit node. It is used as the primary exfiltration and C2 server. Another suspicious IP is 91.108.56.201, linked to a secondary upload endpoint. The Pastebin-related IP 104.20.209.113 is marked as medium risk because it was used to retrieve instructions.
The clean destinations include Google DNS and normal browsing to Google or Reddit infrastructure. This teaches students that not every external connection is bad. A good analyst must separate normal traffic from suspicious traffic.

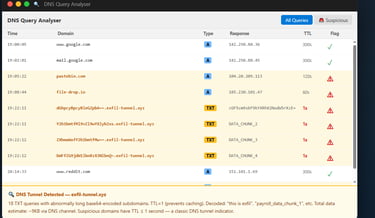
The tenth screenshot shows the DNS Query Analyser. This section teaches DNS tunneling.
The lab shows DNS TXT queries to exfil-tunnel.xyz. The subdomains are long and encoded-looking, and the TTL is set to 1 second. The tool also identifies that the data appears to decode into exfiltration-related chunks.
This matters because DNS is normally used to resolve names, but attackers can abuse it to move small pieces of data out of the network. Students need to understand that DNS traffic should not always be ignored just because DNS is common.
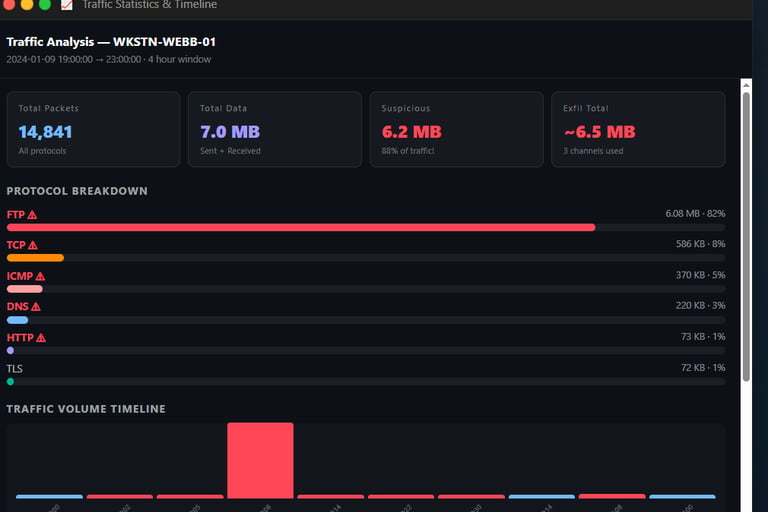
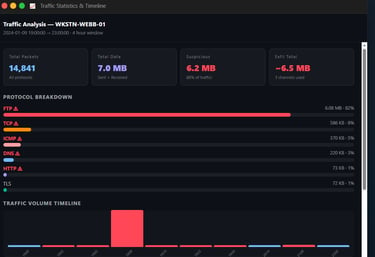
The eleventh screenshot shows Traffic Statistics and Timeline. This gives students a high-level view of the volume of traffic.
The lab shows 14,841 total packets, 7.0 MB total data, 6.2 MB suspicious traffic, and about 6.5 MB estimated exfiltration. FTP accounts for most of the suspicious data, with 6.08 MB, which is about 82% of the protocol breakdown.
This section teaches students how to quantify an incident. It is not enough to say “data was exfiltrated.” A strong report should explain how much data left, which protocol carried it, and when the biggest transfer happened.
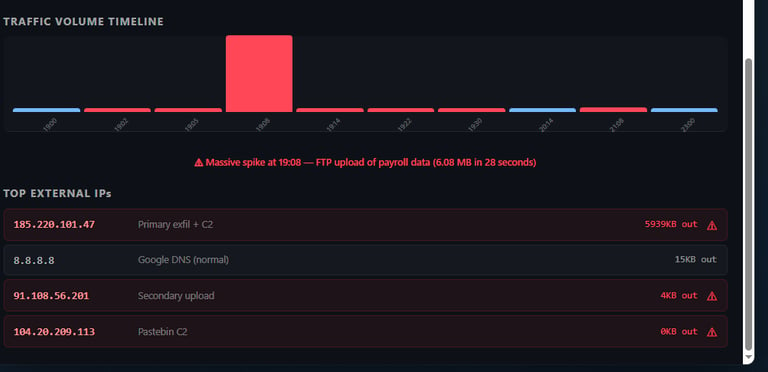
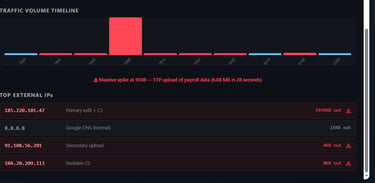
The twelfth screenshot shows the traffic spike at 19:08. This is the most critical moment in the timeline because that is when the FTP upload of payroll and M&A files happened.
The same screenshot also shows the top external IPs. The primary exfiltration and C2 IP is 185.220.101.47. The secondary upload endpoint is 91.108.56.201, and the Pastebin C2 instruction host is 104.20.209.113.
This teaches students how timelines help investigations. When you can identify the exact spike, you can connect it to the file transfers and explain the incident clearly.
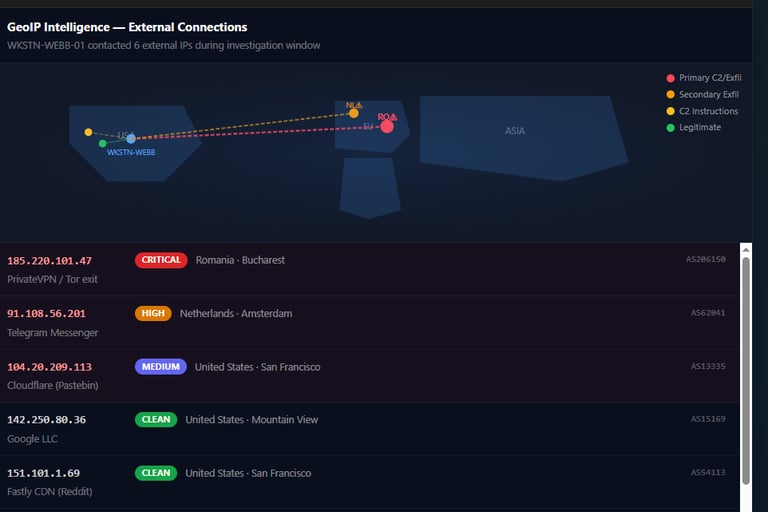
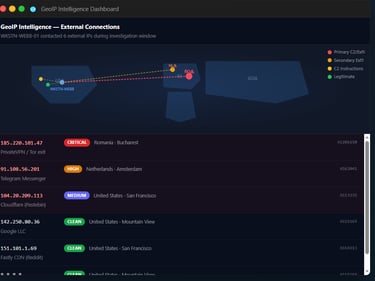
The thirteenth screenshot shows GeoIP intelligence. It maps external connections and gives risk ratings.
The primary exfiltration IP 185.220.101.47 is listed as Romania, Bucharest, with a critical risk rating. The secondary upload endpoint 91.108.56.201 is listed as Netherlands, Amsterdam, with high risk. The Pastebin-related IP is listed as United States, San Francisco, with medium risk.
This section teaches students that GeoIP is not proof by itself, but it adds useful context. It helps the analyst explain where traffic went and why certain destinations deserve more attention.

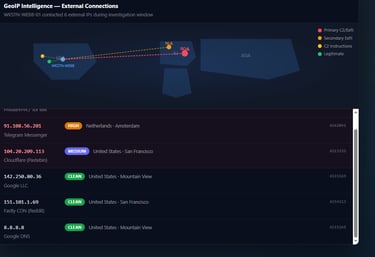
The fourteenth screenshot continues the GeoIP view and shows clean destinations like Google, Reddit, and Google DNS. I included this because students need to learn balance. Not every connection is suspicious, and not every external IP should be treated as malicious.
A good SOC analyst must be able to say, “This is suspicious,” but also, “This appears normal.” That prevents false positives and makes the report stronger.
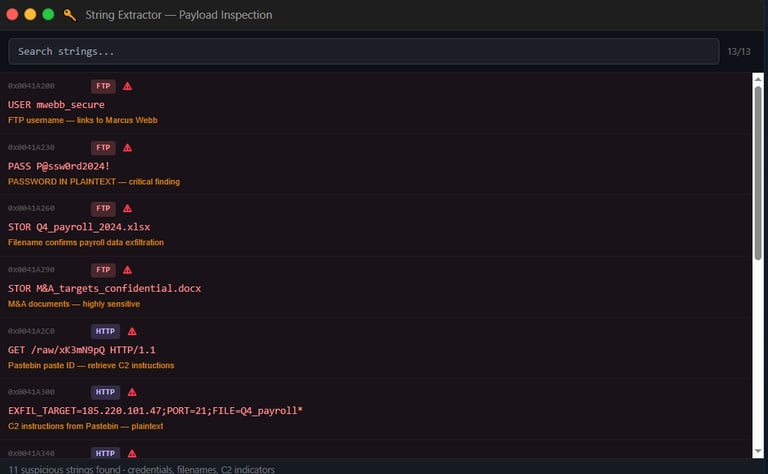
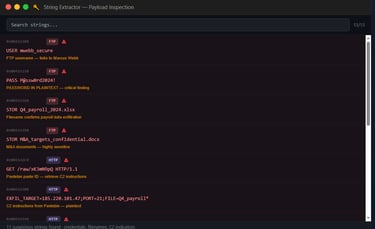
The fifteenth screenshot shows String Extractor findings. This is one of the easiest ways for beginners to understand the evidence because it pulls out readable strings from the traffic.
The lab shows USER mwebb_secure, PASS P@ssw0rd2024!, STOR Q4_payroll_2024.xlsx, STOR M&A_targets_confidential.docx, and the Pastebin raw URL. These strings confirm the exposed credentials, the uploaded files, and the external instruction retrieval.
This section teaches students that strings can quickly reveal the story hidden inside network traffic.
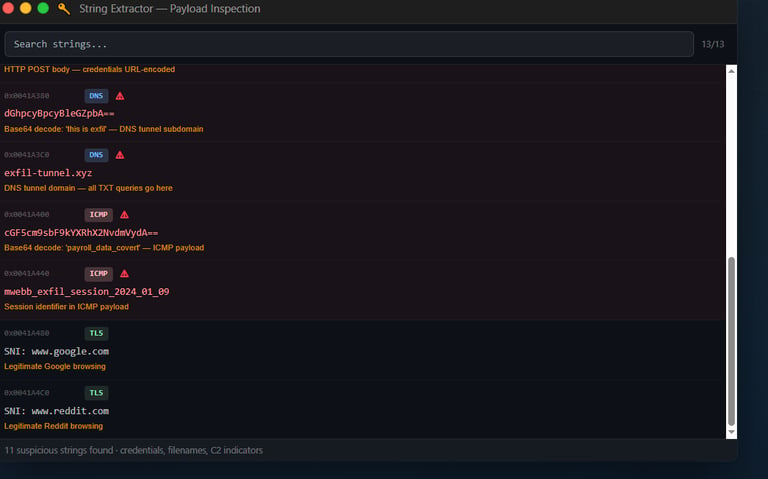
The sixteenth screenshot shows more string evidence. It includes encoded DNS tunnel data, the domain exfil-tunnel.xyz, ICMP payload indicators, and a session identifier mwebb_exfil_session_2024_01_09.
This is important because it confirms that FTP was not the only exfiltration method. The traffic also included DNS tunneling and ICMP payload activity. The lab teaches students to keep investigating even after finding one obvious method, because attackers may use multiple channels.
After reviewing all the evidence, the incident report can be completed. The primary exfiltration server is 185.220.101.47. The confirmed stolen files are Q4_payroll_2024.xlsx and M&A_targets_confidential.docx. The exposed credential is mwebb_secure with the password shown in plaintext. The exfiltration methods are FTP upload, HTTP POST upload, DNS tunneling, and supporting ICMP payload activity. The C2 beaconing used 185.220.101.47:4444 with a 60-second interval.
For my portfolio, this lab is important because it shows I can create practical SOC training around real investigation skills. The lab teaches packet analysis, session reconstruction, credential discovery, file transfer analysis, DNS tunneling detection, traffic volume analysis, GeoIP enrichment, string extraction, timeline building, and incident reporting.
The biggest lesson from this lab is that network forensics is about evidence correlation. One packet alone may not prove the full case, but when Wireshark, NetworkMiner, DNS analysis, traffic statistics, GeoIP, and strings all point to the same activity, the investigation becomes strong.
Overall, this SOC Network Forensics Lab gives students a realistic way to learn how to investigate data exfiltration. They do not just look at traffic. They learn how to tell the full story: who was involved, what system was used, what data left, where it went, how it moved, and what action should be taken next.
INCIDENT REPORT — SOC CASE SOC-2024-0047
Date: January 15, 2024
Analyst: Winston Ighodaro
Reviewed by: Sarah Mitchell (SOC Manager)
EXECUTIVE SUMMARY:
Investigation of workstation WKSTN-WEBB-01 (192.168.1.45) confirmed unauthorized data exfiltration after business hours. The system uploaded sensitive payroll and M&A documents to an external FTP server, used DNS tunneling and HTTP POST requests for additional data transfer, and maintained command-and-control (C2) communications with a remote server in Romania. Evidence shows exposed credentials, multiple exfiltration channels, and long-running beaconing activity.
SUBJECT:
Full name: Marcus Webb
Title: Senior Finance Analyst
Workstation: WKSTN-WEBB-01
IP Address: 192.168.1.45
TIMELINE OF EVENTS:
19:00 — Laptop becomes active (4 hrs after badge-out)
19:02 — ARP discovery activity begins; workstation probes multiple local IP addresses.
19:05 — DNS query for pastebin.com followed by HTTP GET request to /raw/xK3mN9pQ; instructions retrieved from external source.
19:08 — Critical event. DNS resolution for file-drop.io leads to 185.220.101.47. FTP connection established using plaintext credentials. Sensitive files uploaded:
Q4_payroll_2024.xlsx
M&A_targets_confidential.docx
19:14 — HTTP POST request sent to 91.108.56.201 (secure-transfer.net) containing user and file upload information.
19:22 — DNS tunneling activity begins through exfil-tunnel.xyz using TXT record queries containing encoded data chunks.
19:30 — Command-and-control beaconing starts from 192.168.1.45 → 185.220.101.47:4444 at 60-second intervals and continues for several hours.
21:08 — ICMP traffic containing encoded payload data observed, including references to payroll data and exfiltration session identifiers.
EXFILTRATION METHODS IDENTIFIED:
1.
Protocol: FTP
Destination: 185.220.101.47:21
Data: Q4_payroll_2024.xlsx (4.2 MB), M&A_targets_confidential.docx (1.8 MB)
2.
Protocol: HTTP POST
Destination: 91.108.56.201 (secure-transfer.net)
Data: Payroll-related upload data and credential information
3.
Protocol: DNS Tunneling (TXT Queries)
Destination: exfil-tunnel.xyz
Data: Encoded chunks consistent with covert data exfiltration
FILES CONFIRMED EXFILTRATED:
1.
Q4_payroll_2024.xlsx
2.
M&A_targets_confidential.docx
CREDENTIALS EXPOSED:
Username: mwebb_secure
Password: P@ssw0rd2024!
Exposure method:
FTP authentication transmitted in plaintext. Same credentials also observed in HTTP POST traffic.
C2 / BEACONING:
Server IP: 185.220.101.47
Port: 4444
Interval: 60 seconds
Duration: Approximately 3.5 hours
Total beacons: At least 160+ beacon events based on duration and interval
DESTINATIONS:
Primary:
IP: 185.220.101.47
Country: Romania (Bucharest)
Risk: Critical - PrivateVPN / Tor Exit Node - Primary Exfiltration and C2 Server
Secondary:
IP: 91.108.56.201
Country: Netherlands (Amsterdam)
Risk: High - Secondary Upload Endpoint
Additional:
IP: 104.20.209.113
Country: United States (San Francisco)
Risk: Medium - Pastebin Infrastructure Used for Instruction Retrieval
RECOMMENDED ACTIONS:
1. Immediately:
Isolate WKSTN-WEBB-01 from the network and preserve all forensic evidence, including the PCAP and endpoint artifacts.
2. Within 24h:
Reset exposed credentials, block 185.220.101.47, 91.108.56.201, exfil-tunnel.xyz, file-drop.io, and secure-transfer.net across security controls.
3. Legal/HR:
Escalate to HR and Legal due to confirmed exfiltration of payroll and confidential M&A documentation.
4. Technical:
Disable plaintext FTP, monitor for DNS tunneling activity, create detections for 60-second beacon patterns, and review all systems for the same indicators of compromise.
ANALYST NOTES:
FTP credentials were transmitted in plaintext.
Two sensitive finance-related files were confirmed uploaded.
DNS tunneling was used as a secondary covert exfiltration channel.
ICMP traffic contained encoded payload data and exfiltration identifiers.
Persistent C2 communications were maintained through 185.220.101.47:4444.
NetworkMiner confirmed approximately 5.8 MB of FTP exfiltration and additional activity through HTTP, DNS, and ICMP channels.
Total estimated exfiltrated data is approximately 6.5 MB.
Evidence strongly supports intentional data exfiltration from the workstation during the investigation window.